Documentation
Streak Styles
The rollup offers a rich selection of styles to easily create dirt for very different material types.
Breakthrough style
Use ´breakthrough´ to add more or less break through areas. This is indeed very easy to control, simply set the percentage of gaps/fills. Get the best results with a few breakthroughs, or a lot, the images below use 9% and 92%. Imagine this on a facade.

9 percent breakthrough

92 percent breakthrough
Strong style
Use ´strong´ to add more or less strong streak. This is indeed very easy to control, simply set the percentage of strong streaks. Get the best results with a few stronger streaks.
Wash style
Use ´wash´ to intensify the wash effect. Combine this with wash length to determine how far the water reaches. The images below use 35% and 44%. Control of this style depends a lot on the radius and the wash length.

35 percent wash
44 percent wash
Rain Edge
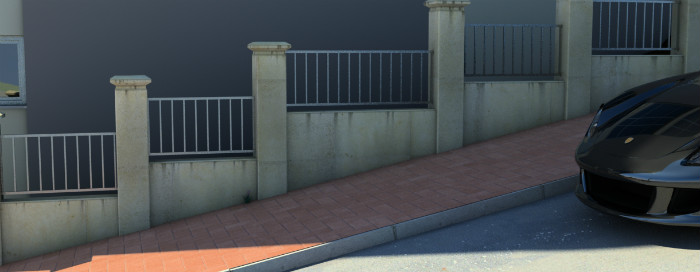
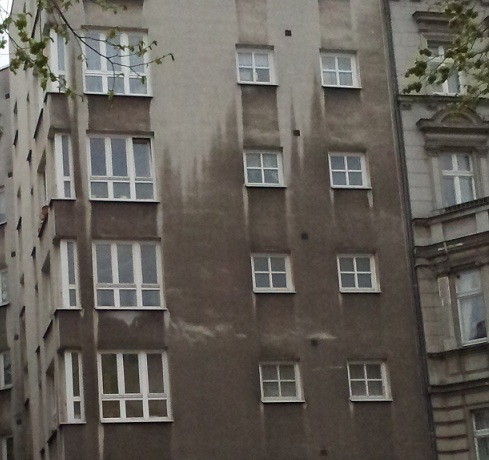
Rain Edge is for sophisticated productions where you need a mask to get realistic dark areas below window benches. Instead of placing streaks directly below the bench the -lower- end is modulated - like by real rain on real facades. Check some photos of weathered real facades and this text becomes much clearer.
Sill edge
Sill edges add strong streaks at the edge of window benches. This can be additive or subtractive. Subtractive removes dirt. Detailed parameters of sill edges are found in a seperate rollup.

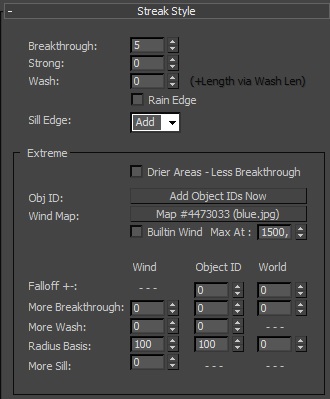
Extreme
All extreme parameters require RichDirt Extreme. You can upgrade to extreme for a convenient price in case you did not buy it at the begin. Send a mail for details.
Drier Areas
RichDirt2 can test that an area would never get rain (like below a balcony). It then reduces the intensity of ´breakthrough´ streaks - less water/rain causes less breakthrough. The computation takes the main wind direction into account, for example on the west side of a balcony more breakthroughs remain. Note: the wind direction is set in the sill edge rollup
Add Object IDs
This button triggers code to add object ids to all objects that did not have an id before. Numbers start at 1, and increase. Object ids are a requirement for the ´ per object id´ variations of falloff, breakthrough, wash, radius. It is easy to forget to set object ids, and then wonder why the parameters falloff, breakhrough ... do not change per object.
Builtin Wind
Enables a builtin height function to get more rain etc at the upper part of a building. Buildings must start at 0 height (worldspace) for this to work. For example if you modelled a hill and a building on top of the hill move it so the building is at 0 of 3ds Max.
Wind Map
Use your own map instead of the builtin wind function. Use red,green, blue to control radius, breakthrough and wash.
Get more detailed control, and do even better images. Using windmaps takes a little extra time, to get a huge gain
in realism. Using windmaps you create absolutely real images.
The big benefit of windmaps is that coarse drawings translate into great results.
Use one mapping (for example bitmap with planar from world xyz) and a single texture that
drives red, green , blue individually. Often one channel is sufficient.
Click images below to enlarge.
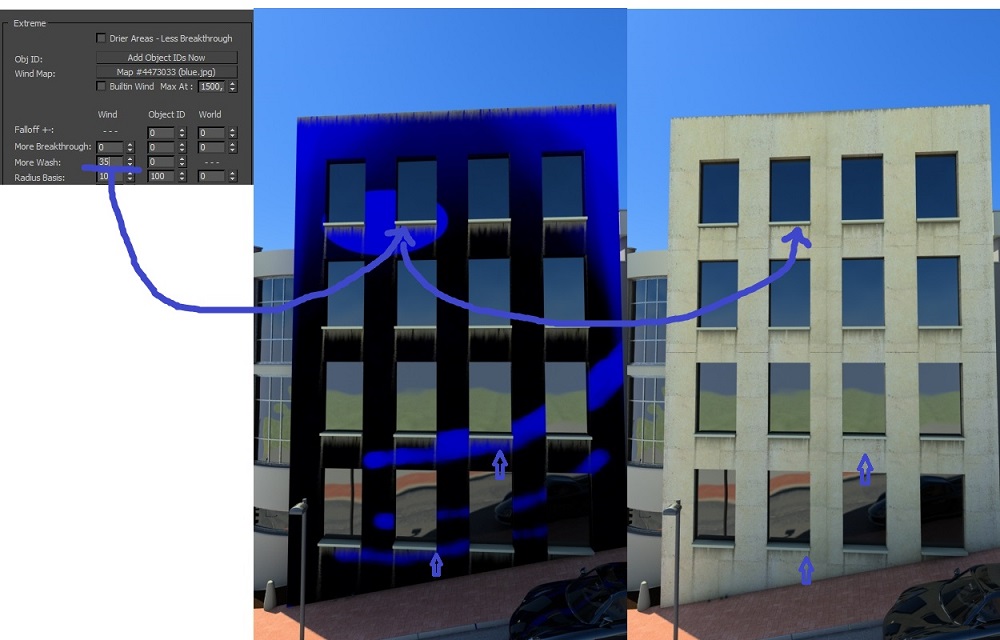
Wind Map: Use the blue channel to increase the wash effect. The wash percentage is 35 (100 would wash to much)

Wind Map: Use the green channel to increase the breakthrough effect. The breakthrough percentage is 100

Wind Map: Use the red channel to SHRINK the radius . This is unexpected, and technically necessary. The more red the texture is the shorter the radius is. The minimal remaining radius must be 10 percent. The image above uses a radius base of 50 percent so the final radius in ´red´ areas is halved.

Wind Map: The image above shows all 3 effects combined - breakthrough 30 percent, wash 10, radius 10. The upper edge of the building
looks great now !
Technical details - wind maps are evaluated at the end point of a ray so streaks can start at the right place.
UV values on the triangle mesh are not available, use mapping sources like Object XYZ and World XYZ for
3d maps ( Cellular, Dent, Marble, Perlin Marble, Smoke, Speckle )
and Planar from Object XYZ, Planar from World XYZ for 2d maps (Bitmap, Checker, Swirl).
Max (wind) At
Get the maximum wind at a certain height. Typically this is the height of your building.
Wind - ObjectID - World
The following table offers the ability to change parameters by Wind, by object id, by world. By Wind uses the builtin wind function. Make sure it is switched on, and the max at is set to the top of you building. By Object ID uses object ids to change parameters. Make sure to assign different object ids to the objects in your scene. By world works automatically, as variation of world space of the builtin streak function. It adds larger scale variations such as bundles of streak breakthroughs, areas with more falloff, and more radius. ´By world´ changes 1/7 of the breakthrough, falloff, radius. You typically see it on large structures (20 meters/ 60 feet).

Falloff +-
Adds more or less falloff, based on the object id, or in worldspace to bundles of streaks.
More Breakthrough
Adds more breakthrough, based on wind, or the object id, or in worldspace to bundles of streaks. The easiest use is per wind. Add a 1-3 percent per object id to get a more realistic images. For very old/dirty results add 5-15 percent per object id.
More Wash
Adds more wash, based on wind, or the object id. This is a bit more tricky to control. The easiest way is to increase it by wind (Builtin Wind), as this simulates the real world effect of more water/rain in the upper part of a building. The strength of the wash effect also depends on the ´wash length´ which is found in the streaks rollup.
Radius Basis
Changes the radius. ´By Wind´ shrinks the radius. ´By Object ID´ shrinks the radius. ´By world´ adds (increases) the radius. Min values are 10% for wind and object id, so the radius never shrinks to 0. Use these parameters for your own style, or approximate reality (if this iy your goal) by shrinking the radius with height (wind), add a few percent only for object id and world. If your main object consists of ´multi-sub´ parts 3ds Max only assigns one id to the whole object. Then use a higher percentage for ´World´.
More Sill
Makes sill edges longer dependent on the height function (Builtin Wind), up to 300 percent. This is optimal to get longer sill edges in the upped part of a building (more water/rain with stronger wind creates longer sill edges in nature).
Real World - sill edges are much shorter in the lower part of the building !
Copyrights
mental images and mental ray, are registered trademarks, and are trademarks of NVIDIA, in the U.S.A. and/or other countries. V-Ray and the V-Ray logo are registered trademarks of Chaos Software Ltd. in Bulgaria and/or other countries. Autodesk and 3ds Max are registered trademarks or trademarks of Autodesk, Inc., and/or its subsidiaries and/or affiliates in the USA and/or other countries. finalRender is a registered trademark of cebas Computer in Germany. All other brand names, product names, or trademarks belong to their respective holders.
enRichPro Copyright © All Rights Reserved