Documentation
Tutorials
Natural Variations
Why 2 tutorials for natural variations ? One for game artists - another one for architects ?
Because game artists need a much more weathered look.
Why are large scale variations so important for better renderings?
Without variations buildings look monotonous, less realistic.
Even adding tons of texture does not solve this.
In any case also have a look at the RTT tutorial, which shows how to bake RichDirt results to a texture.
What causes large scale variations in the real world?
Buildings get a ´tint´ from weathering via wind. Wind is stronger at the edges of a building and at the top,
with strong impact on dust, dirt, rain.
This tutorial shows how to easily add this effect with RichDirt.
More Advantages of the approach described here are:
- no manual painting required (save time)
- no memory for huge textures required
- fast rendering
- single setup for many different materials
- no precise uv mapping required
1. Load the tutorial scene
For V-Ray click here. For mental ray here. For 2016,15,14,13,12,11 and V-Ray click here for mr click here Old versions show warnings , ignore these please. Make sure you have gamma and LUT correction enabled for 3ds Max. Select Camera001. Render the scene:

Expert users can skip items 2 to 6.
2. Open the Compact Material Editor.
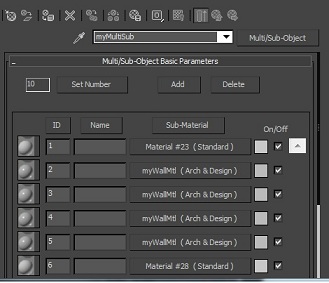
Create a new Multi/Sub Object material. Name this ´myMultiSub´.
3. Create a new V-Ray material or mental ray Arch and Design material.
Name this ´myWallMtl´. (Note: to easily export from 3ds Max to your game engine you might want to use a 3ds Max standard material instead. Many exporters have better support for the standard material).
4. Open ´myMultiSub´ material again.
Add ´myWallMtl´ to slots 2,3,4,5 of myMultiSub. Make sure to use -instances- (not copy, we want the same wall material used 4 times). Note: add can be done via drag and drop in 3ds Max. Your ´myMultiSub´ should now look like:
4b. Assign myMultiSub to the building
Select the 2 walls in the viewport. In the material editor press the ´Assign Material to Selection´ button.

5. Now go back to ´myWallMtl´.
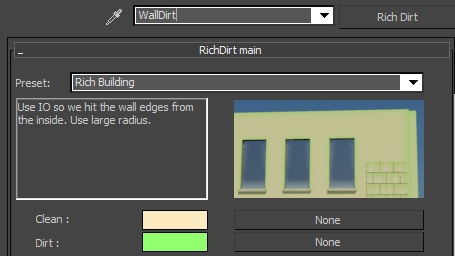
Click the diffuse color map button, to add a RichDirt texture. Name the new texture ´WallDirt´.
6. Make the Dirt color -green-
Green is used here so it is easier to see the effect. Also change the ´Clean´ color to rgb 0.973, 0.851, 0.612. Select the ´Rich Building´ preset.
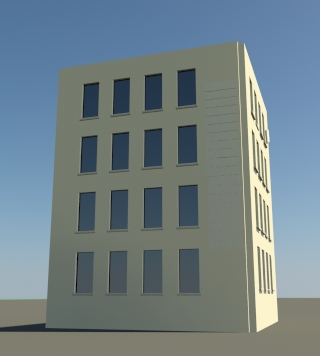
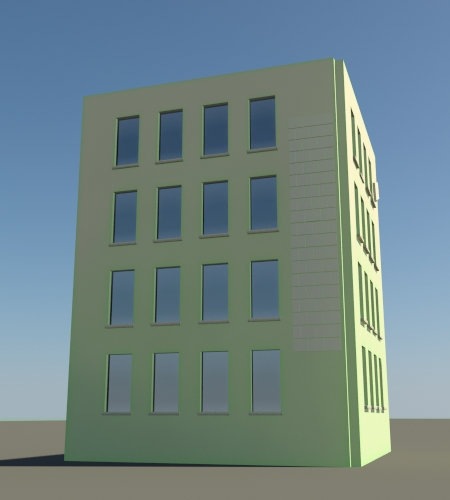
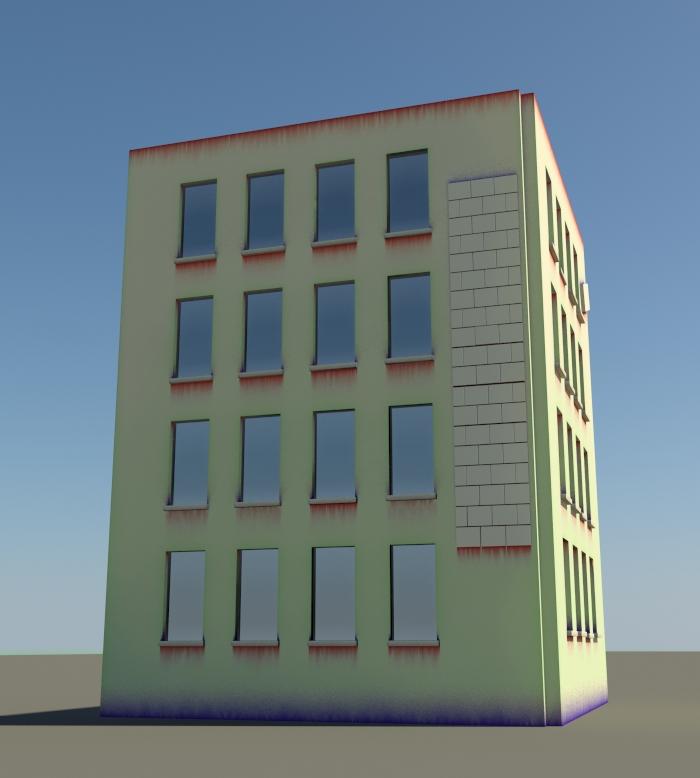
If everything worked fine the image should look like below. Note that V-Ray might add global illumination, then the image can even look better.
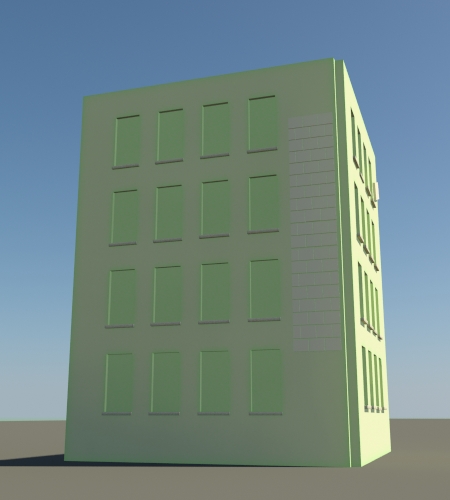
7. This image looks good ...
(except for the windows) but we still don´t have a ´large scale variation´ - the structures around the windows are identical all over
the facade. The building edges have also the same intensity top+bottom, left+right.
How to add the large scale variations ? The following part of the tutorial dives deeper into realistic
weathering. Step by step. Game Artists tune a city with all its buildings - use RichDirt
with the steps below to get as much extra effects as possible, for free when doing texture baking.
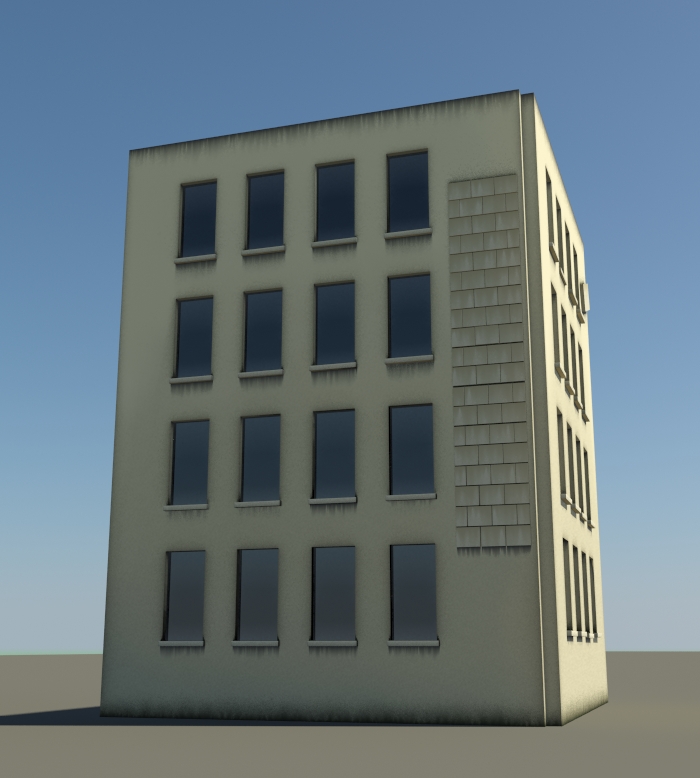
8. Adding a large scale variation.
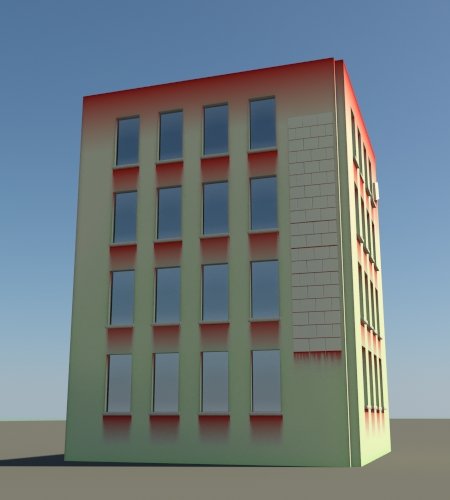
Our goal is to make it realistic, and we know that wind + rain + dust are the real forces for these variations. Click the RichDirt Radius map button - to add a Bitmap. You find the Radius map in the main rollup. To download the wind.jpg from this website select it and right-mouse + save. This works in most browsers.
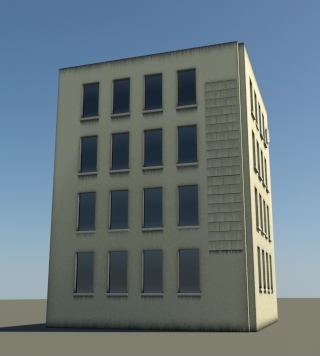
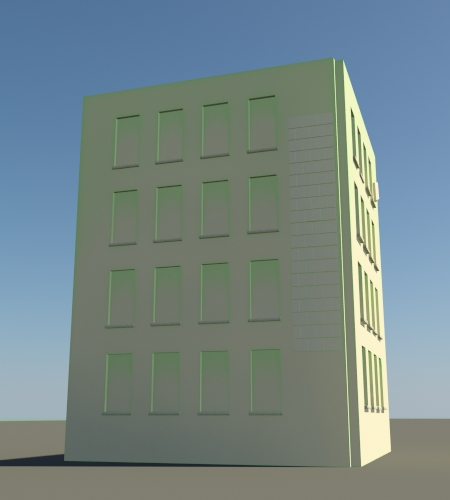
Wind.jpg needs must be maped to the full facade. Create the bitmap for the ´radius´ multiplier (RichDirt main rollup). Select the main geometry, add a UV map modifier. Use box mapping, make the box match with the building, especially the upper edge should match. In the bitmap texture make sure ´Mapping´ is set to ´Explicit Map Channel´ and ´Map Channel´ is 1. The uv modifiers values are used by the bitmap that way. Render to get the following image:
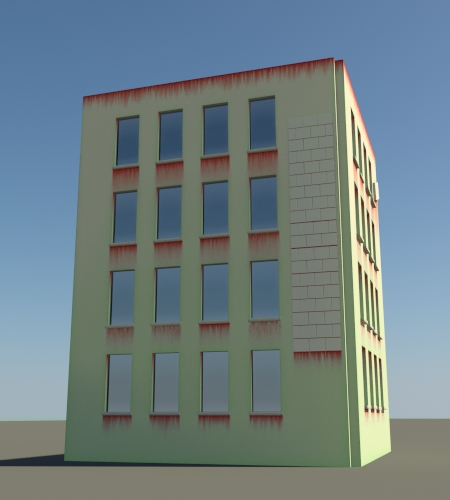
9. Does the image above look real ? No ! Why ?
On real buildings more dirt is found in the lower part, as wind is slower and less rain washes less dirt away. How do we get this effect ? It is easy in 3ds Max. Make a copy of the wind bitmap. Invert the bitmap, but do -not- use the ´invert´ button - switch on ´Color map´ instead, and invert the function below by dragging left control point to 1.0, and the right control point to 0.0: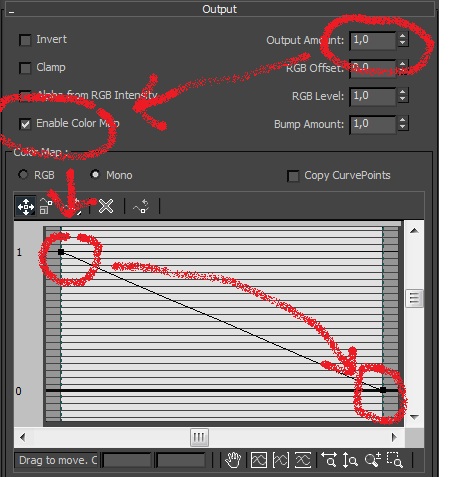
10. Also adjust the output ´RGB Offset´ to 0.5.
What for ? The offset is to make sure the upper part of the texture isn´t completly black. Black would cause a radius of 0 cm (0 * 50 cm) , so inner occlusion wouldn´t find obstacles. Easy: Playing with amount and offset you can control how dirt is distributed over the building. If you weather several buildings of a city simply modify the rgb offset and you have a nice variation.
10.b Add the mirror material for the windows.
The tutorial uses a multi-sub material. The scene uses a single mesh, to assign a glass material assign it to id 6 of the multi-sub material. By chance the windows have id 6. VRayMtl: Diffuse black, Reflect white. Ior 2.0. Or use an arch + design material: Diffuse 0.0, Reflectivity 1.0. Ior 2.0, Brdf by ior.11. Now add streaks.
Go back to the myWallMtl. We need a composite map with 2 dirts in it.
Single steps: In the diffuse slot create a 3ds Max composite map.
This isnt directly possible in the compact material editor.
Right-mouse on the map button. First say ´copy´ for the existing richdirt map in the slot.
Then say ´clear´. Then left-mouse the map button. Choose the composite map.
Once inside the composite map right-mouse the big area on the left side, and select ´Paste Instance´.
This uses the copied green dirt from above.
Add a second layer for streaks (there is a little + sign in the upper right corner).
Create a new RichDirt, select Preset ´Below Bench (strong)´.
Use red as its dirt color. Switch on io in the main rollup (some of the benches are small so they are only
found by io rays). Make sure the composite mode for the new layer is ´darken´.
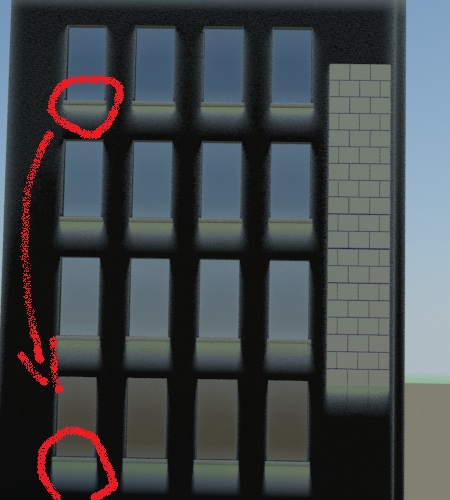
Render:
Hm, no streaks visible - what happened ? IO dirt covers AO streaks - We forgot to enable streaks ´For IO´ in the streaks rollup. Do that now. Render:
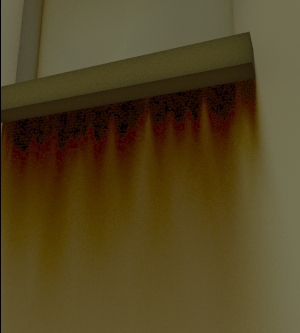
12. The next step is for dirt aficionados.
It shows how to add even more realism. Background - the streaks we have so far run down from the benches in a very even way. Real world benches have an area to the left and right that is ´eaten´ away because rain hits dust from the side. Typical values are 50 degrees for strong wind (upper part of a building) and 8 degree for ´average´ wind.How do we get these angles into the model ? Use wind.jpg again, this time non-inverted. White remains white. Gray remains gray. If we look at wind.jpg we see 0.16 for the darkest parts. And white (1.0) for the brightest ones. To map 0.16 to 8 deg we use a bitmap ´Output Amount´ of 50: 0.16 * 50 -> 8. The brightest parts then have a value of 50, which is what we wanted.
Where to use these values ? Go to myWallMtl/Diffuse Map/ Composite Layer + the streak layer that you created before. Go to the "mask" part of this layer (on the right side), create a fully new RichDirt with Preset ´Below Bench´. Set the spread manually to 1 degree. Assign the new wind texture to the spread (use Bitmap + wind.jpg, reuse map channel 1). Set the output amount of the bitmap to 50. Set "Spread" of RichDirt to 1 degree. The wind values are multiplied to the 1 degree, so we get 8 deg for gray 0.16 and 50 deg for white 1.0. Invert black and white, i.e clean color must be black. Name the texture ´windmask´.
Make a test rendering that only uses the mask, so we can be sure there is no error. Create a new material, name it ´masktest´, add the ´windmask´ to its diffuse slot. Let´s check how the mask looks like:
We get different shapes for the area below benches, especially top versus bottom.
This is exactly what we wanted ! If your test doesnt look like above: did you use
black for clean color ? In the ´windmask´ make sure Inner Occlusion is on.
13. Add the mask to the composite map that we created in Step 11.
Also create a RichDirt Splashes texture. The composite map now should have:a) The ´RichBuilding´ texture that creates the large scale variation.
b) The Streaks + their Mask.
c) The Splashes (simply create a new RichDirt, Preset ´Splashes Variations´, use 5.0 for ´Lower Edge´ to get more splashes at the ground. Extend radius to 70 cm. Use blue as dirt color for the start)
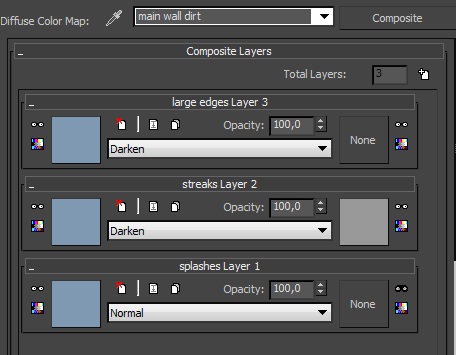
Use ´Darken´ as mix mode for the composite map. Now render to check :
Do you see a slight difference ? This is because you use RichDirt 2, which has a slightly different streak generator. To get the exact image as above go to the streaks layer, to the streak style rollup and set ´wash´ to 10. This adds a stronger wash effect. Make sure Wash Len is set to 0.0 for both io and ao in the Streaks rollup. Try ´wash´ 30 to see how you like it.
14. The last step - use real colors for dirt.
The easiest way is to take the clean color, make it darker and more saturated. We use slightly different colors for splashes and streaks to get a richer image. Also adjust glass (diffuse, reflectivity) to fit with weathered style. Mixing colors with the 3ds Max composite map can be tricky with the ´darken´ mode, it kind of requires that you indeed take dark colors for the streaks - which is good here as we want a really dirty image.
For really dirty areas in a game the ´Subtract´ mode can be interesting. Use black for ´clean´ and a gray value for ´dirt´ and subtract them from the main layer - the main layer needs a soft brown color (here 0.97, 0.67, 0.28) to get nice subtractive results.
mental images and mental ray, are registered trademarks, and are trademarks of mental images GmbH, in the U.S.A. and/or other countries. V-Ray and the V-Ray logo are registered trademarks of Chaos Software Ltd. in Bulgaria and/or other countries. Autodesk and 3ds Max are registered trademarks or trademarks of Autodesk, Inc., and/or its subsidiaries and/or affiliates in the USA and/or other countries. finalRender is a registered trademark of cebas Computer in Germany. All other brand names, product names, or trademarks belong to their respective holders.
enRichPro Copyright © All Rights Reserved